Many of my hometown readers will recognize this classic cookbook published in 1979 by the Mother's Club of Episcopal Day School in Jackson, TN. It has tons of quintessential Southern recipes and offers a little glimpse into life three decades ago. For example, the names of the women submitting the recipes are listed like "Mrs. Paul (Emily) Taylor"... I'm no feminist but, wow. Anyway, last week I needed a bite-size classic Southern recipe for our Southern booth at Paul's school's International Fair so my mom suggested the Pecan Tassies from this cookbook. Since I already disgraced my Southern heritage when I admitted in last week's post that I don't drink sweet tea it makes this confession a little easier: I've never eaten pecan pie. This dessert is, of course, a staple at every one of my family's special occasion meals but I've never even been tempted by it for some reason. My family will probably now disown me... sorry! BUT, I can definitely say that, after making these little tassies, I will literally be claiming my piece of the pie at the next family gathering.
So, without further ado, here is how you make these darling little pecan pie minis...
Ingredients:
Dough
1 stick butter
1 3-oz. package cream cheese
1 cup flour
Filling
1 tablespoon butter (softened)
3/4 cup brown sugar
1 whole egg
1 teaspoon vanilla
1/8 teaspoon salt
1 cup chopped pecans
You will also need a 24-cup mini-muffin pan (or 2 12-cup pans).
Directions:
This recipe is super easy but takes quite a bit of prep ahead of time. An hour or two before you want to actually begin making the tassies you will want to take the stick of butter, the extra tablespoon of butter, and the cream cheese out of the refrigerator to soften. You want the stick of butter and cream cheese to be very soft because the dough will be sticky enough as it is. Once you're ready to start, mix the stick of butter, the cream cheese, and the flour with a mixer. Again, it will be very sticky. My dough kept balling up around the beaters and, even though I made four batches of these, I never did figure out how to keep it from doing this. If anyone knows how to prevent this please feel free to contribute because it's pretty infuriating. I did discover that if you lift the beaters up out of the dough and let them spin just inside the bowl a lot of the dough will fling off, but you're still left with an annoying amount stuck on the beaters.
Anyway, once you've got the dough mixed (and dug out of the beaters) you'll need to put it in the fridge to chill thoroughly. I'd say for about an hour or two (I warned you about the prep). Once it's chilled it will turn pretty hard but you'll be able to scrape off a little at a time in order to roll it into 24 balls. They should be about an inch and a half in diameter.
Now it's time to move onto the filling so stick the dough balls back in the fridge to stay cold while you're working on the filling. Combine the ingredients for the filling. It will look like this in case you were wondering:
Now take your dough balls and press them into the mini-muffin pans. You want the edges to be as high as possible so as to contain the filling.
Fill each shell with 1 teaspoon of the filling. You don't really want the filling to go over the edges of the shells because once they're cooked they won't look as pretty.
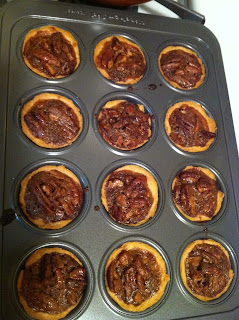
Cook in a 350 degree oven for 30 minutes. Mine were done after 28 minutes so you may just want to watch them towards the end depending on your oven. Let cool a little before removing them from the pans. Store in an airtight container (if you can manage to refrain from eating them all immediately).
Thank you to Mrs. Jack (Carolyn) Cunningham for this super-delicious recipe ;) Hope you guys enjoy it!


No comments:
Post a Comment
I love to hear from you! Thanks for visiting!